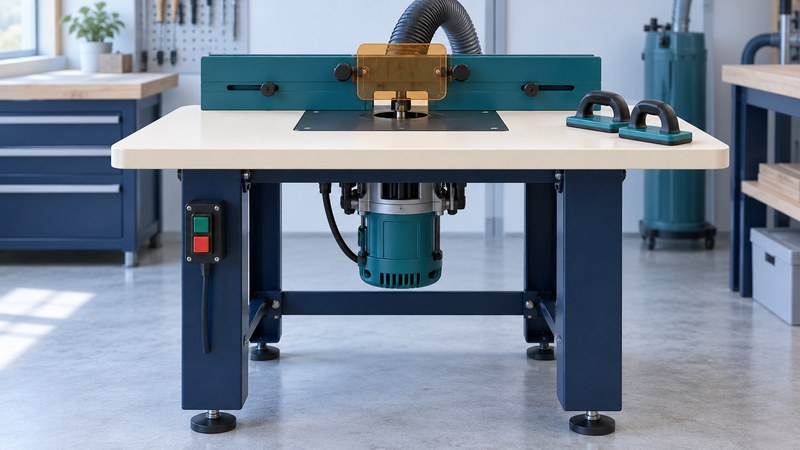
Choose table routing for a defined job
On a router table, the router stays mounted beneath the surface while the work moves past the cutter. This can make repeated edge profiles and suitably supported small components easier to organize. Large panels or awkward shapes may be more manageable with a handheld router and a suitable guide. Decide which arrangement lets you support and control the whole workpiece.
Begin with one operation: for example, a straight guided edge profile on flat, square stock. Curved work, stopped cuts and specialized joinery each need a different arrangement. Learn the particular operation from the equipment instructions and suitable training before treating the table as a general-purpose shaping station.
| Part of the system | Confirm before buying or setting up |
|---|---|
| Router and mounting plate | Approved router base, mounting pattern, hardware and supported weight. |
| Cutter and insert | Permitted bit size, speed, insert opening and required clearance. |
| Fence and guard | Adjustment range, secure locking and protection for the intended cut. |
| Work support | Stable mounting plus support for the full infeed and outfeed length. |
| Controls and extraction | Accessible stop, compatible electrical ratings and specified dust connection. |
Bosch’s RA1181 compatibility list illustrates why router model and base type both matter: some listed routers are approved in their fixed base only. Check your exact combination rather than assuming every router from a brand fits.
Establish a stable surface and clear controls
Mount the table as its maker specifies. With power disconnected, check that the plate sits flush and locks securely, the router is correctly attached and the selected insert supports the stock while clearing the cutter. A lip at the plate can interrupt a feed even if the rest of the tabletop looks flat.
Arrange cords and extraction hoses so they cannot catch the work or obstruct the operator. Keep the stop control reachable without passing a hand over the cutter. Verify the switching arrangement and electrical ratings from the table and router manuals; a socket that accepts a plug does not establish compatibility.
Plan where the entire piece begins and ends. Long stock needs appropriate support without tipping. For short or narrow stock, establish the approved jig, push block or other holding arrangement before work. If you cannot maintain support and hand clearance throughout the pass, choose a different setup.
Set the fence, guard and feed path together
The Bosch RA1181 operating manual (PDF) explains the fence-trap hazard: for edge routing, do not put the stock between the fence and the exposed bit. Feed against rotation. On the usual straight fence setup viewed from the operator’s side, this is right to left; verify the diagram for your machine and operation.
Set the fence faces, opening and overhead guard to the manual’s required clearances. Featherboards and push aids must suit the cut and must not trap the stock. For curves, use the specified bearing or template guidance, starting arrangement and guard; removing the fence alone does not create a complete curved-routing setup.
CCOHS shaper guidance reinforces the need for suitable guarding, hold-downs, push blocks and feed against rotation. Keep hands away from the cutter, wear eye and hearing protection and control dust with suitable extraction. Loose clothing, jewelry and unsecured long hair do not belong near rotating machinery.
Make one verified trial cut
- Identify the bit, stock and reference face. Confirm permitted speed, height and pass sequence from the bit and router instructions.
- With power isolated, inspect and secure every adjustment. Verify the guided path, work support and clearance from clamps and guards.
- Use matching scrap for the first cut, starting clear of the cutter. Follow the prescribed feed method and keep the push aids available before starting.
- Stop fully before checking the result. Compare profile, dimensions and joint fit with the intended finished part.
- Disconnect power before adjusting. Repeat the trial until the result is right, then label and retain the sample.
Stop when the setup loses control
Unexpected vibration, work lifting, a shifting fence or failing dust collection is a reason to stop and investigate. Let the cutter stop completely, isolate power and find the cause. Do not reach beneath the guard or try to correct a shifting workpiece beside a moving cutter.
Separate setup faults from cutting faults. An inconsistent profile can begin with uneven stock, debris under the work or a loose adjustment; a burnt edge can involve the cutter condition and feed. Inspect these before changing several settings at once. Consult the bit maker for the permitted correction.
At the end of the job, leave the power isolated, clean the table safely and store the cutter with its identification. Record the router, bit, insert, fence arrangement, reference face and tested result. A later repeat job begins with an inspection and another trial, especially if any component has changed.
Choose your next guide
- Router Bits — Choose profiles and shanks for the intended routing operation.
- Delta Table Saws — Identify the saw and plan its cutting setup.
- Hearing Protectors — Choose protection for the exposure and check the fit.
Browse woodworking and shaping or explore all 47 tool guides.